First if you are considering a trip there, are you sure it would be worthwhile for you? I made good use of my time there but I'd imagine that some people, had they known what was available in their hometown, would have realized they could have done the same research in the hometown at a much lower cost. Before considering a trip to Salt Lake City, pay a visit to your local Family History Center. I will be detailing this in a post in the near future but much of what is available in Salt Lake City is also available at the Family History Centers across the country. If all you need is to examine a handful of microfilm rolls, do it locally for $7.50 per roll. Yes, you can view an unlimited number in SLC for free but don't forget to add the cost of gas or airfare along with the cost of a hotel room and eating out. If, on the other hand, you need to view books that are not available locally, or you need to search through dozens of microfilm rolls, it may make sense to take a trip to SLC.
When planning a trip there, be prepared! Figure out exactly which microfilm rolls and books you need to look at. You can do this without ever leaving the comfort of your own home. Why waste your precious time you have at the Family History Library doing something you can do long before you get there? Go to Familysearch.org and look through their catalog to compile of list of microfilms to examine during your visit. Make note of which ones are there onsite and especially note if any are stored in the Granite Vault. If they are stored in the vault, you'll need to request to have them available to you. From the time of your request, plan on it taking most of the day before they're available for you to look at. There's no cost but they need to be delivered on site. Request these when you first get there, then dig in to look at the items that are already available.
I recommend purchasing a handscanner, such as a Magic Wand scanner or a Flip Pal. Bring your laptop and a USB flash drive. This way you don't have to pay photocopy costs and you'll have them in digital format on your computer immediately.
Where to stay? Everyone will have their own preference but we enjoyed "Crystal Inn". This is a decent hotel. It's nothing extravagent but it is clean and quite large. It is almost exactly a one mile walk from the hotel to the Family History Library. When walking, find the tall tan building that appears to tower above anything else you see in the downtown area and walk towards it. This isn't the exact building you're looking for but when you get there, you'll see Temple Square.

The Family History Library is at the west end of Temple Square. Cross the street from Temple Square to the west and you will walk directly into it.

Immediately in the front door is the welcome desk. They'd be happy to point you in the right direction. If it's your first visit, they'll give you a sticker with your name on it that says "First Time Visitor" that is to get you extra special help while there.
Just past the welcome desk to the left is the welcome video room. Here you can view a video about family history and why it is important.


If you're already a seasoned genealogist, you can skip this but if your family is along and they don't understand your hobby, it can be a good video to see. Back towards the front welcome desk is the door to the Canada book and family history book room.

This is where you'll find books of family histories already published along with books for research in Canada.
If at any time you get stumped and need some help, ask the people that are there to help you. They'll find the best person to help you. They are very kind and helpful and are happy to be of service.
Back to the front desk reception area, you'll see a stairway up to the second floor, which is the United States and Canada microfilm room.

Right out in front on any of the floors, you'll see an Information desk.

This is where you'll find people to answer any of your questions about the library or to give you insight into your research. Just past this is a bank of computers for you to do research or look up what books or microfilms you'd like to look at. Past these on the second floor are the microfilms.

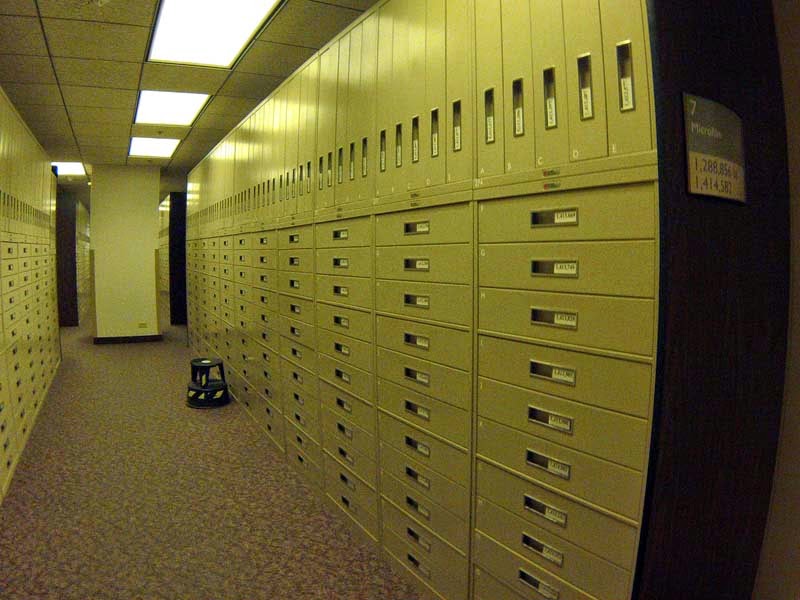


You find the microfilm you'd like to look at and bring it to the rows of microfilm readers.

Each reader has a notepad for you to jot down the number of the microfilm you looked at. This helps them keep track of which rolls see the most use. You can also take a photo or scan of this page to help you log your research.

When you find an image you'd like to hold on to, you can take a photo of the image on the reader using your camera (Don't use a flash!) or you can bring it to the area of microfilm scanners.


You can roll the film up onto its roll and carry it that way or you can pull both the storage and the takeup reel off the reader and carry them in tandem. That way you'll be very close to the page you want to scan.
Load it up in the reader/scanner and start the software. It will take a bit of practice but the software will automatically roll the film, zoom in and out, and focus the image so you're looking at exactly what you want to scan. Insert your USB flash drive scan and tell it where you want to store the image (on the flash drive) and hit "scan". Be sure to click the icon near the clock in Windows to tell it to stop your USB flash drive so it's not damaged when you remove it.
When finished on this floor, go out the door to the lobby and turn to the left and you'll see the elevator.
The inside button panel will tell you what is on each floor. Here is a photo of the US and Canada book room. It looks much like any other library until you realize that every book is chosen specifically for its suitability for genealogical research.


Finally, if you're in the area, be sure to have pizza and gelato at Settebello.

And an update. I know I mentioned that my brother had a terrible accident and I requested your prayers. Those prayers have been answered. Here is a video telling my brother's story:

--Matt
No comments:
Post a Comment